This nice simple craft piece for Imbolc is ideal for children and adults alike and comes from a wonderful book by Glennie Kindred called 'Sacred Celebrations.' I found some various examples around the net. Hope they inspire you all.
You will find a link for each page under the images.
Beannachd
Reki
Linda's Handcrafts
Brigid's Cross ~
Traditionally made to hang on the door or in windows at Imbolc (similar to God's eyes). Traditionally woven out of grass, straw, rushes or vines. If you are using dried materials, soak them in hot water first to restore their flexibility. You can also use wool. Natural woven wools are the most interesting, but children like to use bright colours.
- Begin by binding two sticks together which are equal length. Silver Birch sticks, Willow or Rowan would all be appropriate wood for the symbolism and significance they represent.
 Tie on the first piece of wool, straw etc, wind it over the first twig, wrapping it around the twig once before moving on to the next twig. Wind it over and round this twig in the same way. Continue round and round in the same pattern, tucking in the ends. These beautiful weavings represent the all-seeing eye of Brigid, to watch over you through the coming year. Shells, beads, tassles or feathers can be hung from it or woven in as you go round. You may try three or four sticks together to make them more elaborate and experimental. Old crosses from last year should be ritually burnt to release the old year and open the way to moving forward.
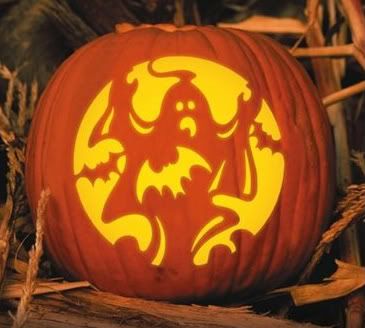
Well we're getting to, what is for many of us, our favourite holiday of the year, Samhain and it's time for thinking not only about our rituals and ancestors, but also the pumpkins!
I've had these templates for a while, but they are excellent. Included in this link is a doc file called "Carve It." This file is a step by step guide on carving pumpkins. Then there are 6 wonderful pumkin designs, ideal for all the family.
If you do have any problems downloading these files, do please let me know and I'll see what I can do.
Click on the following links to down load the pages!
Carve It - How To Carve Your Pumpkin!
Pumpkim Design 10
Pumpkin Design 16
Pumkin Design 19
Pumpkin Design 21
Pumkin Design 23
Pumpkin Design 28
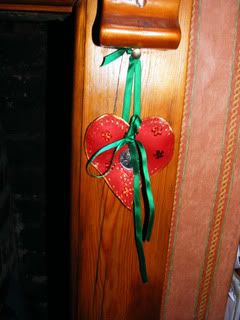
What You Need:
A4 Card To Make Heart Template - Click Here To Download Template
Red/glitter Fimo Clay - (Should need about half, maybe less)
5 Red Gem Flowers - Optional
Gold Ink or Craft Paint
Narrow Green Ribbon, about 3 yards
A silver coin
Glue - One that will stick the coin and gems to the Fimo
Fine paint brush
Kitchen foil
Rolling pin
Baking Tray
How To Make:
NB: All the time you are making this plaque think of it's purpose. See you and your loved ones happy, in good health, and feeling prosperous. This will empower the plaque with your intentions!
- Set your oven as per instructions on the clay packet.
- Download the template and print onto A4 card. Cut this out ready for use.
- Roll out the Fimon clay. Want's to be a little under 1/2cm
- Place your template over the top and using a knife (one you'd eat dinner with will be fine), cut around the template. Take your time.
- Make two holes, about 2 cm apart at the top of the heart , about 1 1/2 cm below the central point.
- Scrunch up some foil onto the baking tray. I made two small mounds for the upper curves of the heart and a smaller one to lay the tail over. Do also remember to have a dip in the centre where you will place your coin. You could press the coin into the centre to create the dip.
- Now you can lay your heart over the foil. Shape the heart until you are happy. this is to give the heart some shape.
- Place in overn and bake for the requited time as per instructed. Note: even once it is cooked, the clay will still feel soft, so don't remove from the foil or tray until it is completely cool!
- Now paint the edge, roughly, with some gold paint or ink. I also dry brushed (this is where youremove some of the paint onto scrap paper before applying brush to surface) some paint over other areas of the heart.
- Once the paint is dry you can glue the coin in the centre of the heart and glue your flower gems and allow to dry.
- Cut enough ribbon to make a loop for hanging the plaque. Thread this through and make a knot.
- Now thread the rest through from the back to the front and tie into a bow.
Your plaque is finished. Mine is by the hearth, but you could place yours near the heart or front door to encourage 'health, prosperity and happiness' to come into your home.
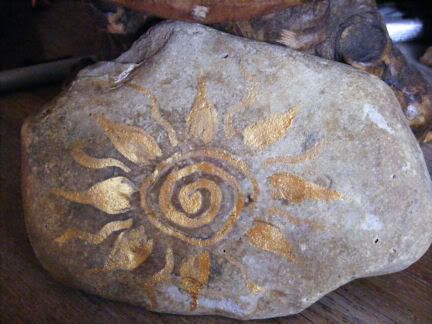
This is a very easy project for most children and can be extended to other pagan symbols. This stones are lovely for alters or in the garden.
What You Will Need:
A flat river or sea stone - about 4 to 6 inches in length (note: Always ask for your gift and leave an offering as a thank you)
A light pencil - HB should be fine
Gold Hobby Paint
Fine Paint Brush
What To Do:
Make sure your stone is clean and dry
Lightly draw your sun design onto your stone. (Younger shildren may need some guidance for this part).
Now carefully paint your design and allow to dry. If pencil lines are showing gently go over the first lot of paint again.
Note: You might want to do a small concegration ceremony once it is completed.
Other Ideas:
Tripple Moon Symbol - Use Silver paint for this
Pentacle - You could make your very own alter pentacle using a lovely stone. Natural things are always nice for your alter.
Totems - you could create some animal totem stones. Keeps your images symple. Take a look through google for idea.
Runes - Pebbles always make lovely runes